

So you’ve finally added lights to your garden. You installed bright LEDs, yet somehow the whole place feels more like a car park than a cosy outdoor retreat after sunset. Unless, of course, you were going for the car park vibes, there’s something wrong with your lighting. The culprit? It’s highly likely the layout.
Even the nicest fittings won't create the right atmosphere if they're scattered around without a plan. And that’s what we’re going to help you figure out. But first, you need to understand that the best garden lighting layout ideas start with how you actually use your outdoor space.
That’s why, even when both are done right, your garden lights and your neighbour’s can look very different. So, how can you do it right?
There are three principles that can lead you to it:
-
Illuminate essential routes
-
Create focal points
-
Layer different types of light to add depth
And best of all, especially if you’re on a budget, you don’t need to illuminate every corner of the garden. In fact, leaving some areas darker can make the illuminated parts look even more striking. Ready to plan a better garden light setup?
Start with a Garden Lighting Layout Plan
Planning might not sound like the most exciting part of a garden makeover, but it sets up the foundation. It doesn’t have to be designer-level, too. A simple sketch will do.
Map Out Your Garden's Main Zones
View your garden from a bird’s-eye perspective. A sheet of paper, a pencil, and a rough rectangle will do. Mark the main features:
-
Patio and outdoor seating areas.
-
Dining spaces and outdoor kitchens.
-
Garden paths, steps, and entrances.
-
Lawn and planting beds.
-
Trees, shrubs, and feature plants.
-
Garden walls, fences, and boundaries.
-
Water features, sculptures, and other focal points.
Next, consider what happens in each area after dark. This gives you an idea of how your lighting should function. A pathway may need enough light for safe movement, while a dining area needs comfortable illumination for eating and socialising.
If you want to feature a tree or plant, you may need a carefully directed spotlight. The key is to treat each zone as part of the bigger picture. Don’t just get a fitting because “this might look good in the garden”.
Decide What Needs Light and What Can Stay Dark
The first priority should always be practical visibility. And, as I said earlier, that doesn’t mean every inch of the outdoor space needs to be bright. Leaving some areas in shadow creates contrast and lets the illuminated features stand out.
Focus on the frequently used paths, steps, and entrances. Also include areas where people prepare food or gather. Once you've accounted for these essential spaces, move on to decorative lighting. Use the light to guide attention instead.
Plan Around Your View from Indoors
Sometimes the best view of your garden is from your living room or kitchen windows, especially in the colder months of autumn and winter. Consider what you see through the windows after sunset.
-
Could a tree become a striking focal point?
-
Would a softly illuminated fence make the garden feel deeper?
-
Could a feature plant near the patio create an attractive view?
(Mark these positions on your sketch.)
Quick planning tip:
Use symbols on your sketch to help you easily differentiate the types of light you’re adding in each zone. For example, use:
⭕ - Circles for functional lighting
⏹️ - Squares for ambient lighting
⭐ - Stars for accent lighting
This makes it much easier to spot gaps, overlaps, and unnecessary fixtures before spending anything.

Use Three Layers of Light for a Balanced Garden
Yes, even outdoor lighting benefits from proper layering. One bright light can make your garden visible at night, but it will lack depth. Instead, combine different light types to create atmosphere, improve visibility, and highlight attractive details.
Ambient Lighting for Overall Atmosphere
This is the general glow that makes your garden feel welcoming.
-
Wall lights can provide a gentle wash of light around a seating area.
-
Festoon lights can create a relaxed atmosphere above a patio or sheltered dining space.
-
Other suitable outdoor fixtures can provide softer illumination
Just remember to keep the brightness comfortable. You want to create an inviting environment, not prepare for an inspection. Most people stop at ambient lighting. But there are two more light types you need to add.
Functional Lighting for Paths, Steps, and Activities
With no walls to reflect light back, even bright fixtures may not be enough to keep the garden practical and safe. Path lights, step lights, and other well-placed task lighting are useful additions to any garden. Consider lighting a flight of steps, a garden entrance, or a food preparation surface.
Pro Tip: Placement matters just as much as brightness. Don't position the light so it shines directly into someone's eyes, as it can make it harder to see the surrounding area and cause glare.
Aim for comfortable, well-distributed illumination.
Accent Lighting to Add Depth and Focal Points
If you want to draw attention to particular features, accent lighting is your option. Think spotlights highlighting a tree trunk, spike lights illuminating ornamental grasses, or uplights revealing the texture of a brick wall. With directional lighting, you can introduce shadows that add depth to the garden after dark.
Try this: A beam grazing across foliage to reveal its shape, and light directed upward through a tree to create a more dramatic effect. But don’t go crazy with accent lighting. Use this layer selectively. Two or three well-positioned features can create a much more interesting scene than dozens of lights competing for attention.
Think about it: when you highlight everything in the garden, nothing stands out. Here’s an overview:

When these layers work together, your garden feels connected.
Garden Lighting Layout Ideas for Every Zone
Now, finally, for the fun part: Deciding where the lights go. When it comes to the best outdoor lighting layout, the answer isn't as straightforward as you might think. It depends on your garden's shape, existing features, and how you use each space. Here are some zone-by-zone ideas to get you started.
Pathways and Garden Walkways
Disclaimer: You don’t need to turn your entire walkway into a runway. Start by marking the main route between your house, patio, garden entrance, and any frequently used areas. Identify bends, junctions, steps, and changes in surface level. These areas typically need good lighting.
Consider installing low-level path lights and bollards along long walkways. Place them in a staggered arrangement where the path width and surrounding landscape allow it. This creates a softer visual rhythm while keeping the walkway well lit.
There’s no universal measurement for spacing your lights. A fitting with a wide beam may illuminate more ground than one with a narrow beam. Also consider brightness, mounting height, path width, nearby planting, and surrounding light levels, as these can affect how you space your lights.
This brings us to the last consideration: Positioning. Ensure that the light falls onto the walking surface rather than directly into people's eyes.
Patios and Outdoor Dining Areas
Patios often serve different purposes. One evening it might be a romantic dining space; the next, a reading nook, a gathering spot, or a cosy place to enjoy a quiet drink. Start with ambient lighting around the perimeter. Install wall-mounted fittings to illuminate the surrounding space, and use festoon lights to create a relaxed atmosphere above seating or dining areas.
Next, consider where you need more focused light. Think outdoor kitchens or food preparation areas for better visibility while cooking. Position lights so they don’t shine in anyone’s eyes. Lastly, add accent lighting beyond the patio to connect it to the rest of the garden visually. Even a softly illuminated tree or planting bed provides an attractive backdrop.
Decking, Steps, and Raised Platforms
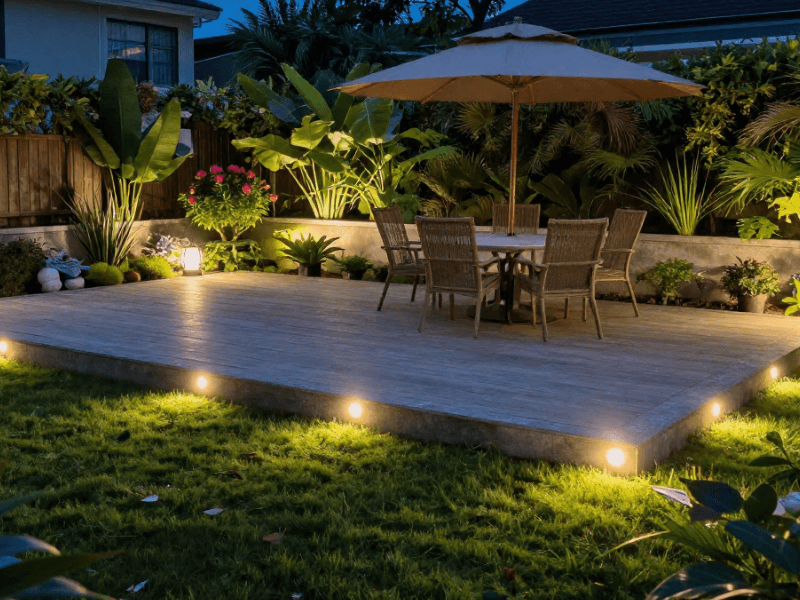
Decking can look fantastic until changes in level and poor lighting suddenly make the whole place a safety hazard. First, identify the edges of raised platforms, steps, paving, and lawn. Practical lighting can make a huge difference here.
Decking lights help define a platform's perimeter or mark step edges. They can greatly improve visibility, making it easier and safer to walk around the deck. Adding dedicated lights to a set of steps can also add the same level of safety.
But wait… You don’t need to outline every board with lights! Too many fittings can create visual clutter and make the space look unnecessarily bright. You know what they say: true strength lies in restraint. Boundaries are easy to identify when not everything is brightly lit.
Finally, make sure the lights you use in exposed locations can withstand the conditions where they'll be installed. Meaning they have the right Ingress Protection (IP) ratings.
Trees, Shrubs, and Flower Borders
What’s a garden for when the flowers and plants are hidden in darkness at night? Add lights to your plants, and they become the most attractive part of your garden. But I’m not talking about lighting up every leaf, no. Use light to reveal their shape and texture.
A mature tree, ornamental grass, sculptural shrub, or plant with interesting foliage can make an excellent focal point. Use spike lights and adjustable spotlights, since they let you direct light where it matters. In this context, your plants.
-
Place a spotlight near the base of a tree and aim it upward to highlight the trunk and branches.
-
Try directing light across the foliage to emphasise its texture.
Don’t stop at one position. Experiment with different angles and placements. Light aimed directly at a plant produces a different effect than a beam that grazes its leaves or casts shadows on a nearby wall. I say this because, surprisingly, some plants will look more striking in partial shadow.
Garden Walls, Fences, and Boundaries
Look at your garden’s boundary. What do you see? The edge of the property? Or a potential for design? If it’s the latter, then wall-mounted fittings can provide useful ambient light along the garden’s perimeter. Other downward-facing lights are also worth considering since they can illuminate the ground while limiting upward glare.
Carefully positioned spotlights can also help reveal the surface of fences or walls with attractive textures. Direct a beam across brickwork, stone, or timber to create interesting shadows. For tall walls, uplighting draws attention upward or to architectural features.
Additional lights on the garden boundary can work well for your property, but be mindful of your neighbours (no matter how nosy they may be). Bright lights can cause unnecessary glare in nearby windows and gardens, so choose appropriate beam angles and direct the light toward the intended surface, not beyond it.
Water Features, Sculptures, and Statement Pieces
If you have a pond, fountain, sculpture, or architectural feature, turn it into the centrepiece of your evening garden. One or two carefully placed lights can draw attention without overwhelming the surrounding space. Keep yourself from overlighting the space. (Again, restraint is key!)
For a sculpture, position a spotlight to reveal its shape and texture. You can also experiment with one-sided lighting to create interesting shadows. For a fountain, carefully selected lighting can highlight the water's movement, though the effect depends on the fountain. Make sure the lights have the right IP rating. We all know water and electricity don't mix.

Garden Lighting Layouts for Small and Large Gardens
The same principles apply across garden sizes, but your space affects the final layout.
Small Gardens and Courtyards
Since you don’t have much space here, a restrained layout is the best starting point. Compact fittings are a great choice for avoiding crowding a small patio or courtyard. Vertical surfaces also become very useful. Lighting a textured wall or a carefully chosen plant can add depth.
Be intentional with the lights you install. A few coordinated fittings will often create a more comfortable atmosphere than a collection of unrelated designs.
Suggested layout:
-
Wall lights beside the patio entrance
-
Low-level lighting along the main route
-
One spotlight highlighting a tree or feature plant
Long, Narrow Gardens
It might be tempting to add two continuous bright lines along the boundaries to highlight the garden's length, but hold off. Instead, stagger your path lights and illuminate plants at different points.
Add a focal point at the far end to draw attention to the back of the garden. This might be a small tree, a sculpture, a feature wall, or a seating area. Keep some sections darker. Contrasting light and shadow create a more layered look than uniform brightness.
Suggested layout:
-
Staggered path lights along one side
-
An illuminated planting feature midway through the garden
-
A softly lit focal point at the far end
Large Gardens with Multiple Zones
If you’re blessed with an expansive garden, you probably have different areas with different lighting needs: patios, dining terraces, lawns, winding pathways, relaxation areas, and several features. The best approach is to plan these areas as separate zones. If you can, separate lighting circuits or controls so you don't have to turn on every garden light when you only need one zone.
Prioritise the most important features, then use secondary lighting to connect the different areas. Remember: Not every zone needs to be equally bright!
Suggested layout:
-
Functional lighting along the main paths
-
Ambient lighting around the dining terrace
-
Accent lighting on selected trees
-
A separate control for the main feature area
How to Position Garden Lights for the Best Effect
Now it’s time to refine the details.
Get Spacing and Beam Angles Right
I mentioned this earlier, but no “universal spacing measurement” works for every garden light. A fitting's brightness and beam angle affect how much ground it illuminates. Mounting height, nearby obstacles, and the intended lighting effect can also influence the result.
A wide beam might cover a generous section of a path, so you can space fixtures farther apart, while a narrow beam might require closer spacing. Still, your desired lighting effect can change that. So, before fixing everything permanently, test the proposed positions. Move the lights closer together or further apart and observe how the illuminated areas overlap. The goal is to create a comfortable, useful light pattern.
Prevent Glare and Unwanted Shadows
When your lights shine directly into people’s eyes, glare is likely. It's especially noticeable around seating areas and pathways, where people naturally look ahead or toward one another. The solution? Use shielding and hide the lights where necessary. Adjust mounting height and choose the right beam angles to keep bright light out of people's eyes.
Also, aim spotlights toward the feature you're illuminating, not toward a path, patio, or neighbouring window.
Choose Consistent Colour Temperatures
Colour temperature sets your garden’s mood after dark. Warm white lighting generally creates a relaxed, welcoming atmosphere. It works well around seating areas, patios, and planting. Neutral white tones may suit certain contemporary designs or spaces that need clearer task lighting, such as outdoor barbecue or food preparation areas.
The key is coordination. Don’t just mix very different colour temperatures willy-nilly. Contrasting colour temperatures can leave your garden feeling “unbalanced”. Choose a main colour temperature for the overall scheme, then introduce alternatives only where they serve a clear purpose.
Common Garden Lighting Layout Mistakes to Avoid
Placing Too Many Lights Too Close Together
Often, more fittings do not create better lighting. Overcrowding your lights creates excessive brightness, visual clutter, and competing pools of light, making it harder to appreciate individual features. Before adding another fitting, ask what it will achieve. Does it improve visibility, highlight a feature or fill a genuine gap in the layout? If the answer is unclear, you might not need it.
Leaving Important Routes or Steps in Shadow
Decorative lighting can make a garden look beautiful, but it shouldn't come at the expense of practical visibility. Shadows add depth, but they shouldn't be where you need practical lighting. Review your routes separately from your decorative features. Check entrances, steps, bends, and transitions between different surfaces.
Ignoring Power Sources and Outdoor Conditions
One of the most important questions when working on garden lights: Where will the power source be located? You can’t just have a convenient power socket behind every shrub.
First, check available outdoor power connections, plan cable routes, and check the fittings’ installation requirements before finalising their positions. Also make sure the fittings have the right IP ratings.
If you’re using solar-powered lights, make sure they’re positioned for maximum daylight exposure to charge effectively. Have a qualified electrician do any mains wiring for safety and compliance.

Turn Your Garden Lighting Plan into Reality
Before buying or installing anything, run through this checklist:
-
Sketch your garden: Mark the patio, paths, planting, boundaries, steps, and main activity areas.
-
Identify your priorities: Highlight essential routes, changes in level, and the features you want to emphasise.
-
Assign a purpose to each fitting: Decide whether it provides ambient, functional, or accent lighting.
-
Check the positioning: Review spacing, beam direction, colour temperature, and potential glare.
-
Confirm the practical details: Check power sources, cable routes, outdoor ratings, and installation requirements.
-
Test: Try temporary light positions at dusk before committing to permanent fittings.
Remember that a successful garden lighting layout isn't about squeezing in as many fixtures as possible. Place the right lights in the right positions to balance visibility and atmosphere, and let selected features shine. If you’re ready to bring your garden lighting plan to life, explore Simple Lighting’s outdoor lighting range to find the perfect fitting for your pathways, patio, planting, and garden features.


0 comments