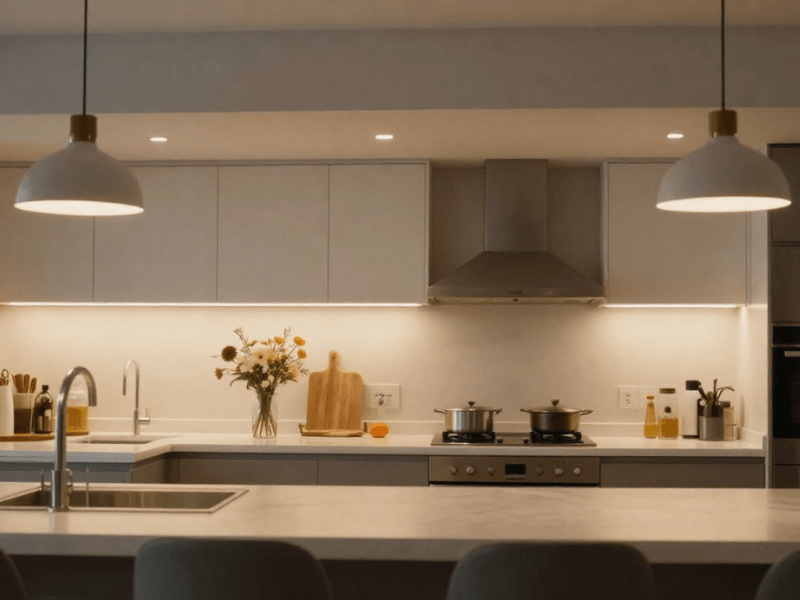


Want to try a simple yet impressive upgrade to your kitchen?
Add LED strip lights beneath your cabinets, and suddenly your worktops glow with purpose, your surfaces look sharper, and your kitchen steps into a more polished, modern version of itself.
It’s true when they say that a well-lit kitchen doesn’t just help you cook better. It changes how the whole space feels.
This guide walks you through everything you need to know, from planning and product choice to installation and finishing touches, so your lighting looks intentional, not improvised.
Why Under-Cabinet LED Strip Lighting Transforms Your Kitchen
Here’s a quiet upgrade that makes a loud difference: Under cabinet lighting. But why is it effective in transforming your kitchen?
First, it improves task lighting exactly where you need it. The problem with overhead lights is that they often cast shadows from your body or cabinets, leaving your worktops dim in crucial areas, a.k.a. your worktops.
LED strip lights solve that by directing light straight onto your preparation space. Chopping, cooking, and reading recipes all become easier and safer.
Then there’s the visual upgrade. Clean lines of light under cabinets create a sleek, high-end look often seen in designer kitchens. Even in older spaces, this simple addition can make everything feel more refined.
It also adds ambience without requiring a full renovation. Switch off the main lights, leave the strips on, and the kitchen softens into a more relaxed, inviting space, perfect for hosting friends and family.
And finally, it’s energy-efficient. Modern LED strips use very little power while delivering excellent brightness. So you get better lighting without worrying about your electricity bill creeping up.
What You’ll Need Before You Start
So, you’ve decided to install under-cabinet LED strip lights. Before diving in, it’s best to gather everything you need. A little preparation saves more than a handful of frustrations later.
1. You’ll need LED strip lights. They usually can be cut to size, but suppliers offer them in set lengths, so make sure you choose the correct span for your cabinet runs, or slightly longer strips that you can trim down.
2. A compatible power supply or LED driver is essential. The driver converts your mains power into the low voltage your LED strips need.
3. You’ll also want connectors and clips for secured mounting, or rely on the adhesive backing that most LED strips come with.
4. For a more premium finish, aluminium profiles are worth considering. These act as a housing for the strip, improving both appearance and light quality.
5. Basic tools: a measuring tape for accuracy, scissors for cutting strips, and a screwdriver for mounting or securing clips.
With everything ready, the installation becomes far smoother.
Planning Your LED Strip Light Installation (The Step Most People Skip)
Planning might not feel or sound exciting, and we totally understand! But it’s the secret ingredient behind a clean, professional result. So, you might as well plan away. Here’s how:
Measure Your Cabinet Runs Accurately
The underside of the cabinet is where you’ll be installing your lights, so measure it properly. Precision matters here. Too short, and you’ll end up with dark gaps. Too long, and you’ll be forced into awkward cuts.
Also consider corners, joins, and other obstacles. If your cabinets form an L-shape, you’ll need connectors or separate strip sections. Mapping this out early avoids last-minute improvisation.
Decide Where to Position the Strip
Placement changes everything. Installing the strip too far back can create shadows on your worktop. Too far forward, and the light source might be visible when you stand or sit nearby, creating glare.
The sweet spot is usually close to the front edge of the cabinet, but still tucked just out of sight. This gives you strong, even illumination without exposing the individual LED dots.
Plan Power Access and Cable Routing
Before installation, think about where your power is coming from. Is there a nearby socket? Will the driver be hidden above cabinets or inside a cupboard?
Also, plan how cables will run so they stay out of view. This might mean routing wires behind cabinets or along concealed edges. A few minutes of thought here prevents visible wires later.
Choosing the Right LED Strip Lights for Kitchen Cabinets
Not all LED strips are created equal. The right choice depends on how you use your kitchen and the atmosphere you want to create.
Warm White vs Cool White vs Daylight
Colour temperature sets the mood and tone of any space.
Warm white (around 3000K) gives a softer, more relaxed glow. Cool white (around 4000K) feels cleaner and more practical. Daylight is brighter and more clinical.
For most kitchens, 3000K to 4000K hits the sweet spot. It balances clarity with comfort, making your kitchen both functional and inviting.
Brightness (Lumens) for Task vs Ambient Lighting
If your goal is strong task lighting for food preparation, go for higher brightness levels. You want clear visibility across the entire work surface.
If the lighting is more about ambience, a softer output works better. It creates a gentle glow rather than a spotlight effect.
Some setups combine both, using brighter strips with dimming options to switch between modes.
Pro Tip: When choosing brightness levels, always look at lumens, not watts.
IP Ratings for Kitchen Environments
Kitchens involve moisture, splashes, and heat. That’s where IP ratings come in. For areas near sinks or hobs, choose LED strips with at least some level of splash protection. This ensures durability and safety over time.

Step-by-Step: How to Install LED Strip Lights Under Cabinets
Once planning is done and the materials are ready, installation becomes straightforward.
Step 1 – Clean and Prepare the Surface
Start by thoroughly cleaning the underside of your cabinets. Grease, dust, and residue can weaken the adhesive backing. Use a mild cleaner and let the surface dry completely. A clean surface ensures the strip sticks firmly and stays in place.
Even if you’re using clips and aluminium profiles, it’s always best to clean the surface.
Step 2 – Cut the LED Strip to Size
Measure again before cutting. “Measure twice, cut once.” LED strips have marked points where they can be safely cut. Only cut at these points to avoid damaging the circuit.
Take your time here. A careful cut now prevents issues later.
Step 3 – Attach the LED Strip
Peel off the adhesive backing and press the strip firmly into place. Keep the line straight as you go.
If you’re using clips or aluminium profiles, install those first, then place the strip inside. This gives a more structured, premium finish.
Step 4 – Connect to Power Supply
Connect your LED strip to the driver, ensuring correct polarity. This step is crucial. Incorrect connections can prevent the strip from working.
Depending on your setup, you may be plugging into a socket or hardwiring into your mains. If you’re unsure about electrical work, it’s always best to consult a qualified professional.
Step 5 – Test Before Final Fixing
Before securing everything permanently, switch on the lights. Check for even brightness, secure connections, and consistent illumination. If anything looks off, fix it now while adjustments are easy to make.
How to Hide Wires for a Clean, Professional Finish
Do you know when lighting looks best? It’s when the source feels almost invisible. That’s called “hidden lighting,” and it’s easier to achieve than you think.
1. Run cables behind cabinets where possible. Even a small gap can be enough to conceal wires completely.
2. Trunking or cable channels are another option. These keep wires tidy and protected, especially along visible sections.
3. Drivers can be hidden inside cupboards, above cabinets, or in discreet corners. The goal is to keep everything out of sight but still accessible if needed.
4. Aluminium profiles take things further. They don’t just house the strip. They diffuse the light, softening the individual LED points into a smooth, continuous glow. The result feels less like a strip and more like a seamless line of light.
Common Mistakes to Avoid When Installing LED Strip Lights
Here are a few common missteps that can affect the final result:
-
Placing strips too far back. It creates shadows where you actually need light.
-
Skipping power planning. This can leave you with visible cables or awkward connections.
-
Uneven strip placement. This can break the clean look of your strip light. Take your time to align and measure everything properly.
-
Skipping surface preparation. This often leads to strips peeling away over time. A quick clean at the start saves headaches later.
Optional Upgrades for a Smarter Kitchen Lighting Setup
A basic kitchen cupboard underlights setup is already leagues apart from having none at all. But like everything else, there’s always room to elevate your setup. Here are some things to consider:
1. Motion sensors. These add convenience. The lights switch on automatically when you enter the space or approach the worktop.
2. Dimmable LED strips. Paired with a dimmable driver, these help you adjust your lights: Bright for cooking, softer for late-night cravings.
3. Smart lighting controls. Adjust lighting from your phone or use remote systems to fine-tune your kitchen atmosphere.
These upgrades aren’t essential, but they can transform your lighting from functional to one that’s tailored for your needs.
Troubleshooting: What to Do If Your LED Strips Don’t Work
Not all installations work as they’re intended the first time… and that’s okay! The good news is that most issues are easy to fix. If your LED strips don’t work:
Start by checking connections. Loose wires or incorrect polarity are common culprits.
Look at the power supply. Make sure it’s compatible (with the correct voltage and sufficient wattage) and functioning correctly.
Check for faulty sections. If only part of the strip isn’t working, replacing that segment usually solves the problem.
This is why doing a test before final installation is crucial for detecting and solving faults and issues early on.

Final Thoughts: Achieving a Professional Kitchen Lighting Finish
Installing kitchen under-cabinet LED strip lighting isn’t just about adding light. It’s about shaping how your kitchen works and feels.
The key is in the details. Careful planning, thoughtful positioning, and quality components all come together to create a result that feels intentional. Just make sure to take your time measuring, be deliberate about placement, and choose reliable products that will last.
Done right, under-cabinet lighting becomes one of those features you didn’t realise you needed, until you have it. Trust us, you’ll even wonder how your kitchen ever worked without it.
If you’re ready to upgrade your space, explore Simple Lighting’s LED strip lighting options that match your layout, your style, and how you use your kitchen every day.


0 comments