


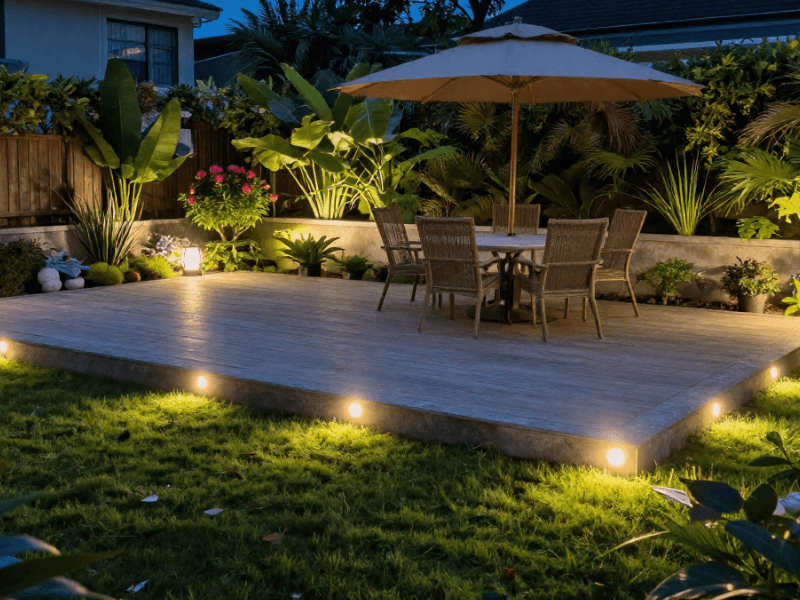


Garden spike lights offer one of the easiest ways to upgrade your outdoor space. No need to rewire your entire garden, or call an electrician (most of the time). Just push it in, adjust as needed, and enjoy.
If your garden looks a bit… invisible after sunset, spike lights fix that in a flash. You’ll get better visibility, safer paths, and a nice glow that feels intentional.
This guide keeps installing spike lights simple. You’ll learn how to install them, where to place them, and how to make them look good. Let’s get cracking!
Why Garden Spike Lights Are Perfect for Your Garden
Without any proper lighting, your garden disappears into the night (a tremendous shame, especially if it looks fantastic during the day). Spike lights can fix that in a jiffy!
They’re Easy to Install
You won’t need to use any complicated tools or dig trenches just to have spike lights. You can also move them at any time, which is handy if you change your mind (you probably will).
They’re Flexible
Whether you want to line a path, highlight a tree, show off your flowerbeds, or just stop guests from tripping over that one step, spike lights can help you make your garden a better place.
They’re Affordable
Even if they might cost you more upfront, solar options help you cut running expenses in the long run. Buy LED versions to further reduce energy consumption.
They Look Quite Good
A few well-placed lights can transform your ordinary-looking garden into a place worthy of your favourite home magazine’s cover. And there are plenty of aesthetically pleasing options out there.
Types of Garden Spike Lights
Not all spike lights are the same. Picking the right type saves you time and regret later.
Solar Garden Spike Lights
Solar lights are the “no effort, still looks good” option.
Pros
- No wiring needed
- Easy to install
- Low maintenance
- Eco-friendly
Cons
- Need sunlight to charge
- Less reliable in long grey winters
Best for
- Pathways
- Flowerbeds
- Areas with good sun exposure
Place these solar stake lights where they actually get sunlight, not under a bush, nor behind a wall.
Low-Voltage or Wired Spike Lights
These are great if you want more consistency.
Pros
- Brighter and more reliable
- Works in all weather
- Can connect to timers or smart systems
Cons
- Takes a bit more effort to install
- May need digging or help
Safety matters when installing these, so it’s best to follow UK outdoor wiring standards. If unsure, call your preferred professional.
LED and Decorative Spike Lights
Most modern spike lights use LEDs. And for plenty of good reasons.
Pros
- Energy-efficient
- Long lifespan
- Plenty of styles
You can go warm white for a cosy feel. Or cool white for a clean look. Some designs focus more on aesthetics than brightness, so better mix function and style.
Step-by-Step Guide to Installing Garden Spike Lights
You don’t need to be handy to install spike lights. You just need a plan and a bit of patience.
Tools and Materials Needed
For this bit, keep it simple. You don’t need a full toolbox.
Essentials
- Spike lights
- Spikes (usually included in the box)
- Measuring tape
- Screwdriver
Optional
- Timer
- Wire connectors (for wired lights)
- Waterproof tape
- Cable clips
- Small shovel (for trenches)
Choosing the Best Location
This is the part where most people tend to muck it up. To avoid joining their club, think about what you want to highlight first. Paths, plants, or features don’t just scatter lights randomly and hope for magic.
A Few Quick Tips
- Space lights evenly for a clean look
- Avoid pointing lights directly into eyes
- Use angles to create soft shadows
- Highlight one feature at a time
And remember: Less is sometimes more. Over-lighting looks harsh and messy.
Installing Solar Spike Lights
As long as you have the right tools and pick the best spot, this part won’t be a problem.
- Assemble the light and spike
- Push it into soft ground
- Place it somewhere sunny
- Angle the panel towards sunlight
- Test it after sunset
If it doesn’t turn on, it’s probably not charged yet. Give it a full day before judging. Oh, and adjust the spacing after dark. Things look different once the lights are on.
Installing Low-Voltage Spike Lights
This will take a bit more effort, but it’s still worth it.
- Plan your layout and measure distances
- Dig shallow trenches for cables
- Lay cables neatly along the route
- Connect wires using waterproof connectors
- Insert spikes and secure cables
Keep cables hidden and protected. No one wants a trip hazard. And test everything before covering the cables. It will save you from having to dig twice.
Testing and Adjustments
This step matters more than you think. Turn everything on and walk around your garden. Look for dark spots or harsh glare.
Adjust the following as needed:
- Angles
- Spacing
- Brightness (if you have dimmable lights)
Also, check the sensors if your lights have them. Motion sensors should trigger smoothly, not randomly.

Maintenance Tips for Long-Lasting Garden Spike Lights
Garden spike lights need minimal effort to take care of. But if you outright ignore them, don’t be surprised if they suddenly stop cooperating.
A little upkeep keeps them bright, reliable, and not quietly quitting in a corner.
Keep Solar Panels Clean
Solar lights only work if they can actually absorb sunlight. Dirt, dust, and leaves can block the panel. If your light looks dim, they’re usually the culprits. Even a thin layer reduces performance.
- Wipe panels every few weeks with a damp cloth
- Clear away leaves and debris regularly
- Check for shading from growing plants
Check and Replace Batteries
Solar lights don’t last forever. The batteries do most of the work. Over time, they hold less charge. That means shorter run times at night.
- Replace batteries every 2 to 3 years
- Use the correct type recommended by the manufacturer
- Swap all batteries at once for consistent performance
If your lights fade early, the batteries are likely tired, not broken.
Inspect Wiring and Connections
For wired lights, this step matters. Weather, moisture, and garden tools can damage cables over time. If something looks off, fix it early. Small issues become bigger ones fast.
- Check connections at least once a year
- Look for exposed or loose wires
- Make sure waterproof connectors are sealed properly
Adjust and Reposition Lights
Your garden changes, plants grow, and layouts shift. What worked in summer may not work in winter.
- Reposition lights to avoid new shadows
- Adjust angles for better coverage
- Space them out again if things feel uneven
Lighting is not “Set once and forget forever.” It’s more “Set, then tweak later.”
Prepare for Harsh Weather
UK weather is unpredictable to say the least. Your lights will know that, too. Heavy rain, snow, and winds can take a toll. A quick check after bad weather saves you from surprises later.
- Secure loose fixtures before storms
- Bring in delicate lights during extreme weather
- Check for water build-up after heavy rain
A bit of maintenance goes a long way. Spend a few minutes here and there so your garden stays lit without drama.
Creative Garden Lighting Ideas Using Spike Lights
This is the part where you stop “just adding lights” and start actually turning your garden into a world wonder. Here’s the general rule of thumb: You don’t need loads of fixtures. You just need smart placement and a bit of restraint.
Guide the Way with Path Lighting
Start with your pathways. This is the easiest win.
Use evenly spaced spike lights to guide movement. It looks clean and helps people avoid awkward missteps.
- Keep spacing consistent for a tidy look
- Use warm white for a softer, welcoming feel
- Avoid placing lights too close together
If it starts to look like an airport runway, you’ve gone too far.
Highlight Your Best Features
Not everything needs a spotlight. Just your best bits.
Use spike lights to draw attention to trees, plants, or garden features.
- Angle lights upwards for trees and tall plants
- Use softer angles for flowerbeds
- Focus on one feature at a time
Good lighting creates depth. Bad lighting just makes everything equally bright and equally boring.
Layer Your Lighting
Flat lighting kills the mood. Layering fixes that.
Mix different types of spike lights to create contrast.
- Use brighter lights for paths and function
- Add softer lights for ambience
- Combine solar and wired lights for flexibility
Think of it like background and foreground. You want both.
Play with Shadows and Angles
Light isn’t just about brightness. It’s about shadows, too.
Changing the angle of a light can completely change how your garden looks.
- Tilt lights to create texture on walls or plants
- Avoid pointing lights straight ahead
- Experiment after dark for the best effect
This is where a bit of trial and error pays off.
Switch It Up for the Seasons
Your garden doesn’t stay the same. Your lighting shouldn’t either.
- Use warm tones for summer evenings
- Try cooler tones for a crisp winter feel
- Add subtle festive lighting when it makes sense
You don’t need a full redesign. Small tweaks make a big difference.
Done properly, spike lights will make your garden feel calm, stylish, and easy to use at night. Otherwise, it will look like you lost a bet. Keep it simple, and you’ll get it right.
FAQs
How deep should spikes go into the ground?
Push spikes in until they feel firm and stable. Around 10 to 20 cm usually works well. If the soil is hard, loosen it first. Forcing it can bend the spike or damage the light.
Do solar lights work in UK winter months?
Yes, but don’t expect miracles. Short days and weak sunlight mean less charging time. You’ll get fewer hours of light at night. Placement matters more in winter, so keep panels clear and in open areas.
Can I mix solar and wired spike lights?
Yes, and it often looks better. Use wired lights where you need consistent brightness, like pathways. Add solar lights around beds and features for extra glow without extra wiring.
Are garden spike lights safe around children and pets?
Most are very safe, especially solar and low-voltage options. Just make sure cables are hidden and secure. Avoid placing lights where they can be knocked over or tripped on during play.
Why are my spike lights not working properly?
It’s usually something simple. Solar lights may need more sunlight or fresh batteries. Wired lights may have loose connections. Check the basics first before assuming anything is broken.

Spike Up Your Garden Lighting: Ready to Get Started?
You don’t need a full garden makeover to make a big impact. A few well-placed spike lights can completely change how your space looks and feels at night.
The key is simple! Pick the right type, place them with purpose, and adjust as you go. Small tweaks in angle or spacing can also make a huge difference.
Don’t feel like you need to do everything at once. Start with one area, get it right, then build from there.
If you’re ready to take the next step, explore Simple Lighting’s range of garden spike lights and outdoor solutions. Visit our site today and choose what fits your space!
We also have The Complete Guide to Garden Lighting, you can check out to get more insights and inspiration.


0 comments