


Christmas sneaks up like a warm glow.
One minute it’s pumpkins and cobweb designs on shop windows, the next you’re seeing sparkle in every corner. Makes you wish your home could feel like a thoughtful, twinkling storybook (without the faff, of course).
Good thing there are LED strip lights. They’re easy, safe, wonderfully flexible, and they’ll transform your festive decor from “nice” to “wow” in an afternoon. Don’t tell anyone this, but they’re a secret power. Shh!
They’re pretty easy to install, too. If you can peel a sticker, you can install LED strips. Ready to make magic this Christmas?
Why LED strip lights are perfect for DIY Christmas projects
So why LED strip lights? LED strip lights are the ultimate DIY companion: they tuck into corners, outline shapes, and create glows where traditional fairy lights simply can’t reach.
Oh, and they’re also low-voltage, energy-efficient, and brimming with personality. Here’s a more detailed breakdown:
Flexibility: LED strips bend around curves, tuck under shelves, and follow frames or edges. This lets you create shapes, outlines, hidden glows, and dynamic effects in places you’ve never lit before.
Cut-to-length convenience: Most strips have marked cut points so you can trim them to fit windows, mantels, stairs, and furniture bases. No more excess loops or messy tails. (Simple Lighting offers a bespoke cutting service!)
Colour options: Choose warm white for that classic candlelit feel, cool white for crisp modern sparkle, or RGB/RGBW strips for multicolour animations, pastels, or gentle golds.
Low running costs: LEDs sip power compared to traditional bulbs that gulp it, so you can let them glow for long evenings without worrying about bills.
IP ratings and safety: For indoor projects, standard strips are perfect (IP20). For porches, windows facing outwards, or damp areas, look for IP65/IP67 protection to guard against moisture.
Higher IP (ingress protection) ratings mean better outdoor lighting performance.
Creativity is your north star here.
LED strips let you add a gentle halo behind decorations, soft lines along stairs to guide guests at night, or playful neon shapes in windows for the onlookers. Which leads us to our first project…
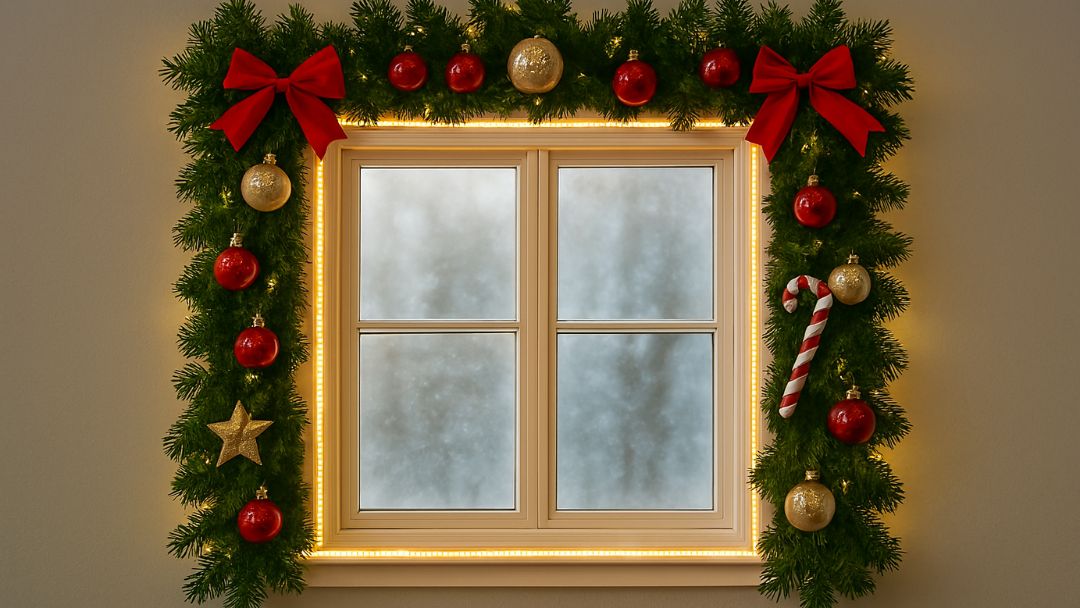
Project 1 — LED strip Christmas window frames (a warm welcome from the outside)
Framing your windows with LED strips creates a polished, festive look that looks great from the street, adding to your home’s curb appeal. It’s crisp, tidy, and delightfully inviting, like wrapping your home in a bow.
Materials & tools you’ll need
LED strips: Choose warm white for timeless charm or RGB/RGBW for colour options and a more modern touch. Look for the correct length and IP rating if the strip faces outdoors.
Adhesives/clips: Use strong 3M adhesive backing or mounting clips; for a premium and professional look, consider aluminium profiles with frosted covers.
Power supply (LED driver): Match voltage and wattage to your strip. Mismatched voltage will cause flickering or premature failure of your lights. The wrong wattage can cause dimming or overloading if you’re not careful.
Remote/smart controller: Infrared remotes are simple; smart Wi-Fi or Bluetooth controllers let you schedule colours and dimming in an app or through voice.
Cable management: Corner connectors, extension leads, and cable clips keep things neat and discreet.
Step-by-step setup for clean, straight lines
Measure and plan: Measure each side of the window. Remember this phrase: Measure twice, cut once. You don’t want a strip that’s too long or too short. Mark your cut points using the printed cut lines on the strip, leaving space near a corner for the power lead.
Prepare surfaces: Clean the window frame with mild soap or isopropyl alcohol to improve adhesion (if you’re using the pre-applied tape). Make sure the surface is dry.
Install diffuser channels (optional): Mount aluminium profiles along edges using screws or strong adhesive. These produce straighter lines and hide LEDs behind a soft frosted cover.
Attach the strip: Starting from the bottom corner nearest the power, peel the backing and press the strip into place in short sections. Use mounting clips at corners or every 30-50 cm for extra security. Make sure the connector end or the plug is close to the power source for easy navigation.
Hide wires: Route the power lead along the frame and down to a discreet corner.
Test and tidy: Power on, check brightness and colour, then gently press along the entire length to ensure adhesion.
Styling ideas for a festive finish
Warm white elegance: Choose 2700K-3000K warm white for that traditional candlelight glow. You can add silhouette decals (stars, reindeer, tree) or paper cut-outs inside the glass for gentle shadow play.
Playful multicolour: Use RGB scenes for family-friendly fun. Think slow fades, pastel cycles, or gold/red/green themes. Frame with garlands, ribbons, or hang lightweight neon shapes inside the window for a layered look.
Pro tip: Keep the light line continuous per window for a clean finish and avoid crossing cables mid-frame.
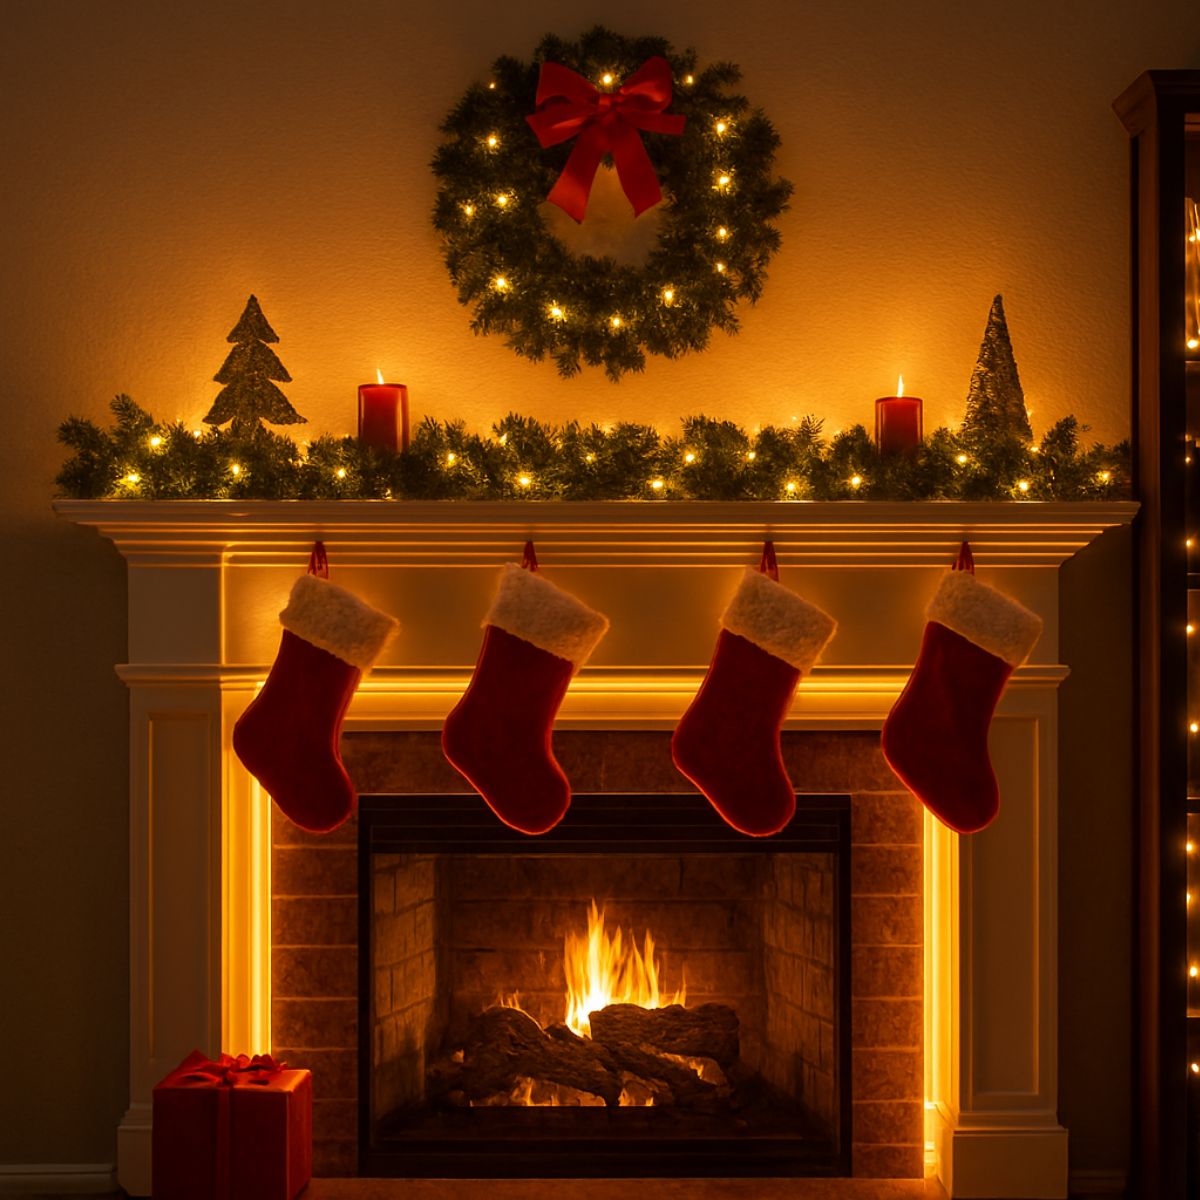
Project 2 — Glowing Mantel or Bookshelf Christmas Scene
Got a fireplace or a bookshelf? Turn them into a cosy stage. Backlighting creates depth, makes ornaments feel magical, and brings that nostalgic Christmas warmth to your living room.
Backlighting decorations for a soft halo effect
Place strips behind objects: Mount LED strips along the back edge of the shelf or behind the mantel lip so light bounces off the wall. This produces a soft halo that frames garlands, baubles, and miniature village decorations.
Create zones: If you have a long shelf, divide it into scenes. You can have a snowy village section, a forest of mini trees, or a candle cluster. Place strips behind each zone for layered depth.
Diffuse the glow: Use frosted diffuser channels or aim the strip towards the wall rather than straight out to soften the light and eliminate glare.
Layering lights for a cosy evening glow
The secret to a well-lit room with depth and personality? Layered lighting.
Mix light types: Combine LED strips for backdrop glow, fairy lights woven through garlands, and battery candles for focal points.
Colour choices: Warm whites and golds pair beautifully with soft reds. If using RGB, warm amber- or gold-toned scenes add candle-like richness without harsh tones.
Balance height: Use books, risers, or boxes under the fabric to vary height. Downlight taller pieces with short strip segments hidden inside their bases.
Project 3 — LED Strip “Glow Trails” for Staircases or Hallways
Imagine a guiding ribbon of light curving through your space. That’s what this project is aiming for. It adds subtle movement to your home. It’s practical for darker winter evenings and adds instant style.
How to create a soft guiding glow
Under-step installation: Mount strips under the nosing of each step or along the vertical riser to create a floating effect. For clean lines and protection from scuffs, choose low-profile channels.
Side-rail glow: Fix LED neon flex or standard strips under the handrail underside and aim the light toward the wall. This produces a gentle wash that’s both safe (no glare) and inviting.
Safety + aesthetics: Keep cables away from tread surfaces. Also consider motion sensors or timers to save energy and add convenience for dark winter evenings.
Dimming matters: For hallways, choose a lower brightness to avoid glare at night. Use warm white or amber for a calming effect that still illuminates each step.
Festive colour ideas for day vs night
For Daytime, warm white at moderate brightness looks clean and welcoming. If your hallway is bright, a soft gold scene adds elegance without overpowering.
When Evening sets in, switch to colour effects like slow red-gold fades or candy cane alternations (red/white). Keep transitions gentle to avoid flicker-fatigue.
Smart scheduling: Set time-based scenes such as warm white mornings, soft gold evenings, and playful colours during gatherings. Many controllers support app routines and dimming presets.
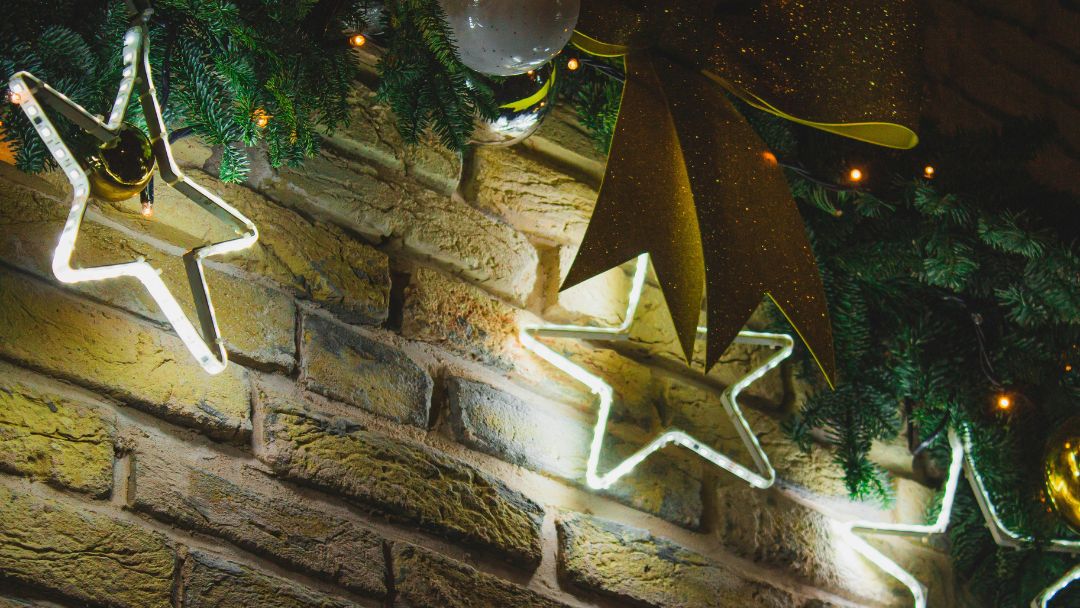
Project 4 — LED Strip Christmas Shapes (Stars, Trees, Snowflakes)
This is where your craftsmanship will shine!
Custom LED shapes are eye-catching, joyful, and surprisingly simple, especially when you use flexible LED neon flex for curves.
Bending LED neon flex to form custom shapes
But why neon flex? Well, LED neon flex has a continuous glow, unlike standard LED strip lights. It also bends smoothly, making it perfect for stars, trees, snowflakes, and script words.
Simple templates you can try:
- Star: Draw a five-point star on a card; pin neon flex along the edges, securing at each corner with clips or ties.
- Tree: Outline a triangle with small branch angles; add a short trunk.
- Snowflake: Use a central hexagon with six arms and short diagonal branches off each arm.
Mounting method: Fix the neon flex to clear acrylic or wire-mesh panels using clip mounts or zip ties. Keep the power lead at the bottom corner for neat cable routing.
Display ideas for indoors & porches
- Window silhouettes: Hang shapes inside the window for a festive outdoor view. Pair with your framed window strips for a coordinated look.
- Hanging signs: Add a “JOY” or “NOEL” neon sign above the mantel.
- Porch outlines: Mount shapes on the porch wall or rail; ensure IP-rated neon flex for weather resistance. Keep connections inside a sealed box and use outdoor-rated fixings.
Project 5 — Creating a Magical Under-Furniture Christmas Glow
Hidden lighting is not just trendy. It’s modern, subtle, and incredibly effective. It makes furniture appear to float and gives your décor a soft cinematic lift without visible bulbs.
Sofas, TV units, sideboards & Christmas villages
Here are some lighting ideas:
Under sofas and sideboards: Fix strips on the underside, 3 to 5 cm in from the edge, facing the floor. Don’t install too close to the edge, or else the strip will be visible. Doing this creates a floating halo under your furniture, making it appear to float. Pretty cool.
TV units and media walls: Tuck strips under shelves and behind the TV for ambient bias lighting. This lessens fatigue, something that your eyes will thank you for. Use warm whites paired with gold accents for festive polish. Or use RGB lights to transform your space with a more modern impression.
Christmas villages: Mount short strips under platforms or behind mini houses to add depth and a moonlit glow. Diffuse with tracing paper or frosted acrylic for gentle shadows.
Placement tips:
- Avoid hotspots: Facing strips toward a reflective floor can create bright points. Use diffusers or tuck further under.
- Colour choice: Warm white or soft champagne keeps things elegant; set RGB to low saturation for a refined feel.
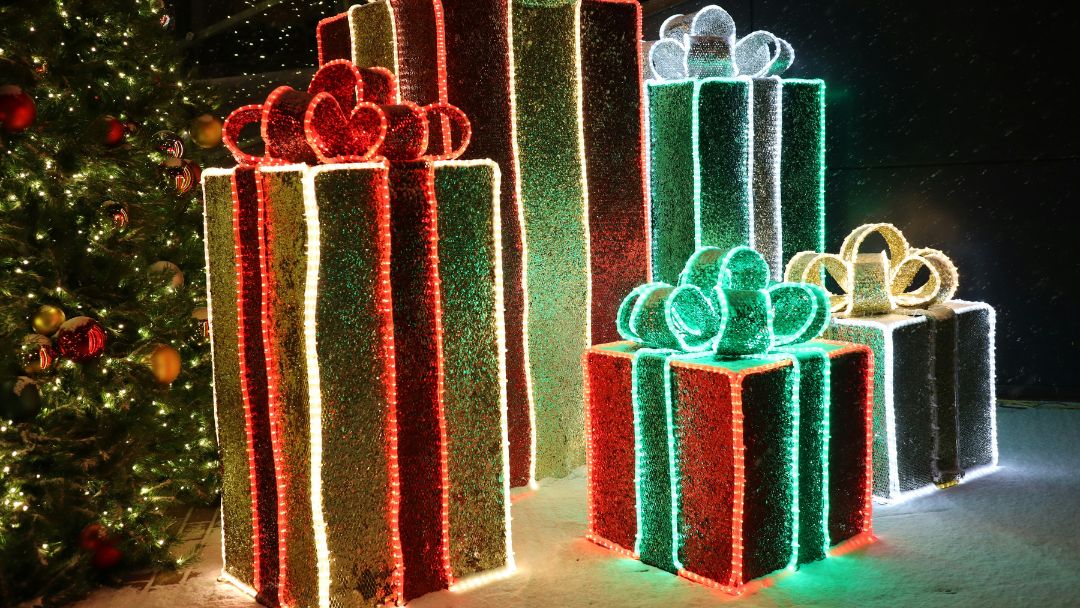
Project 6 — DIY LED Christmas Gift Boxes (A Show-Stopping Feature)
This is a trend-forward centrepiece that looks high-end and custom. Stack glowing presents by the tree, in the hallway, or in bay windows.
They’re sure to stop people in their tracks. (We don’t mean to block the way, though!)
The best part? They’re pretty easy to make.
Building the frame
You can make the boxes using different materials:
- Acrylic boxes: Clear or frosted acrylic cubes give a polished look. Drill small holes for cable routing; sand edges lightly to avoid sharp corners.
- Mesh frames: Build cubes from wire mesh or grid panels; they’re lightweight and great for zip-tying strips. Diffuse by wrapping it with sheer fabric.
- Clear crates: Repurpose transparent storage boxes. Flip upside down for a clean base. Add ribbon trim to disguise edges and cable entry.
Wrapping with LED strips for a dynamic sparkle
Cool vs warm vs multicolour:
- Cool white: Frosty, modern sparkle that’s great for glassy finishes.
- Warm white: Classic glow, pairs beautifully with gold ribbon.
- Multicolour: Playful and bold. Use slow fades or sparkle effects with RGB LED controllers.
Wrapping technique:
Run strips vertically along corners or horizontally in stripes. Keep consistent spacing for symmetry, and add a bow made from neon flex for a standout topper.
Next is stacking the boxes:
- Tiered display: Three boxes of varying sizes, smallest on top, tied with matching ribbon.
- Colour gradient: Warm white at the bottom, gold in the middle, and champagne or pastel at the top.
- Story corner: Place glowing boxes beside a mini tree and a lantern for an Instagram-worthy nook.
How to power & control your Christmas DIY projects safely
Your Christmas project will be nothing but pale decorations without power. A few smart choices keep everything reliable, safe, and easy to use.
Choosing the right LED drivers/power supplies
LED strips are typically either 12V or 24V. Your LED driver/power supply needs to match that. Getting the right wattage is also crucial. Just add the total watts (per metre) of your strips and then add at least a 20% margin for power surges.
Pro Tip: Avoid overly long runs from a single driver; distribute power points to reduce voltage drop.
Battery options for window designs
Consider battery-powered or USB-powered mini strips for short runs in windows. This will save you a lot of time with the wiring. Just make sure to keep spare packs charged for quick changes, and mind runtime versus brightness.
Smart control, timers, and remote dimming
A simple remote controller can handle the basic on/off, brightness, and colour changes. But smart controllers take your lighting to the next level, letting you create schedules and scenes, and control the lights via voice.
Indoor vs outdoor safety reminders
- Use IP65/IP67 for exterior-facing, damp, or porch installs.
- Keep wires away from foot traffic, pets, and pinch points.
- Avoid covering strips with thick fabric. Instead, use aluminium profiles for heat dissipation and clean lines.
- Rely on clips/channels in addition to adhesive for a more long-term installation.
Final Inspiration – Mix & Match These Projects for a Complete Christmas Glow
Of course, we will not let you go without handing out a few design inspirations you can work on right away. Here are theme suggestions to get you started:
Classic:
- Window frames — Warm white outlines with garland silhouettes.
- Mantel glow — Soft halo behind a nativity or festive village.
- Under-furniture — Gentle champagne glow under the sofa for evening warmth.
Palette: Warm whites, gold, a touch of soft red.
Scandinavian:
- Minimal lines — Simple window borders and a neon star in the bay.
- Bookshelf stage — Clean backlighting behind wooden trees and ceramic houses.
- Stair glow trails — Low amber light for comfy evenings.
Palette: Warm amber, natural wood, linen textures.
Colourful family:
- Multicolour windows — Pastel fades or candy-cane patterns.
- Gift boxes — Stacked RGB packages near the tree.
- Hallway trails — Playful colour scenes for evening parties, warm white by day.
Palette: Bold RGB, soft pastels, cheerful ribbons.
Minimalist modern:
- Under-furniture — Clean white or champagne under sofas and behind media units.
- Porch outline — Single neon shape: abstract tree, bell, or snowflake.
- Mantel — Slim backlight strip with monochrome decor.
Palette: Cool white, champagne, matte black accents.
Final Tip:
As you build, keep it simple and repeatable. And don’t forget all the guidance you received from this post.
Most important of all, have fun. Know that you’re not only decorating your home. You’re creating a space for memories. Wishing you a warm, sparkling Christmas! May your lights glow as brightly as your gatherings.
Don’t forget to check out Simple Lighting for our wide range of LED strip lights and LED neon flex to kickstart your next Christmas project with high-quality (yet affordable) fixtures.
We’ve also got more lighting ideas here: Christmas Lighting Ideas for UK Homes, so make sure to check them out!


