


Wiring and power supply might not be the most exciting parts when it comes to LED strip lighting.
But behind every smooth LED glow, there’s a well-wired system doing the heavy lifting. Power and wire your LED strips incorrectly, and they’re sure to fail.
Think of it like the foundation of a building: if it’s weak, everything above it suffers… or crumbles down later on. The same goes for your LED lighting setup.
That’s why in this guide, we’ll break down everything there is to know about LED strip wiring and power supplies. It will help you choose the right setup, teach you how to wire LED strips safely, and avoid common pitfalls in wiring LED strip lights.
Ready to wire like a pro?
Understanding LED Power Supplies
First off, get yourself acquainted with power supplies.
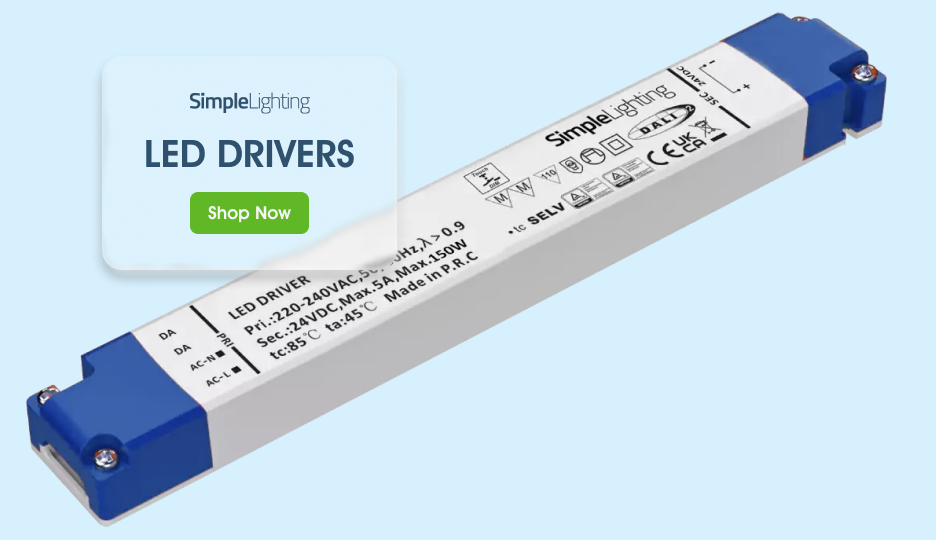
What Does a Power Supply Do?
To the unknowing eyes, an LED strip light, especially the plug-and-play kind, might seem like it runs directly off the home’s mains electricity.
No, it doesn’t.
UK mains power is 230 volts AC (alternating current), but LED strips usually require low-voltage DC (direct current) power, typically 12V or 24V DC (in some cases 5V). In other words, LED strip lights are low-voltage lights.
And that’s where a power supply (also called an LED driver or transformer) comes in. Its job is to safely convert 230V AC to a stable DC voltage that your LEDs can use.
If you notice those that “box” where the plug is connected to, and are also connected to the LED strip on the other end, that’s the power supply.
Without the conversion provided by the LED driver, connecting LEDs directly to mains power would instantly destroy them. Your power supply acts as a bridge. It ensures your LEDs get the voltage and current they need without risking overload.
Choosing the Correct Voltage
Check the labels! Your LED strip comes in one of the different voltage ratings for LEDs. The voltage rating of the power supply you need to use should match the LED strip voltage exactly.
If your LED strip is rated for 24V, using a 12V power supply would make it extremely dim, or it might not light up at all. Conversely, connecting a 24V power supply to a 12V strip could instantly burn out the LEDs.
So, always remember: 24V connects to 24V, and 12V connects to 12V.
Calculating the Correct Power Supply Size
Every LED strip consumes a specific amount of power, usually expressed in watts per metre (W/m). To find the right LED strip power supply, you need to calculate the total wattage required by your LED run and then add a 20% safety margin to prevent overloading.
Here’s an example of how to do this:
- LED strip power rating: 9.6W per metre
- Length of strip: 5 metres
- Total power required = 9.6W x 5m = 48W
- Add a 20% safety margin: 48W x 1.2 = 57.6W
So, you should choose a 60W (or higher) power supply.
Pro Tip: Always round up, not down. Running a power supply too close to its limit causes excess heat and shortens its lifespan.
Wattage and Current
We’re doing a little bit of simple maths, but this is essential knowledge for making sure you’re wiring and powering your LED strip lights properly.
If your LED strip uses 24V, you can calculate the current draw with the formula:
Current (A) = Power (W) ÷ Voltage (V)
Using the above example:
48W ÷ 24V = 2A
Your power supply must therefore deliver at least 2A at 24V.
Efficiency
An LED power supply’s efficiency refers to the ratio of the usable electrical power it can give to the LED strip to the total power it draws from the mains circuit.
This is expressed as a percentage (e.g., 100%, 90%, 80%, etc.) Choosing an efficient power supply (typically 85-95% efficiency) means there is less energy loss (heat), reducing running costs and extending both the driver and LED lifespan.
Wiring Basics for LED Strips
Once you’ve chosen the right power supply, the next step is wiring…properly. Yes, doing it properly makes all the difference.
Poor connections or incorrect wire sizing can cause voltage drop, flickering, or even overheating. You don’t want that.
Choosing the Right Wire Gauge
The thickness of the wire, or gauge (AWG), determines how much current it can safely carry without significant voltage loss.
Thin wires have higher resistance, which means more voltage drop, especially over long runs. The longer your run is, the thicker your wire needs to be.
TIP: Lower AWG number means thicker wire.
If you notice the far end of your LED strip dimmer than the start, undersized wiring might be the culprit.
Series vs Parallel Wiring
There are two main wiring methods for LED strips: series and parallel.
Let’s look at the difference.
Series Wiring
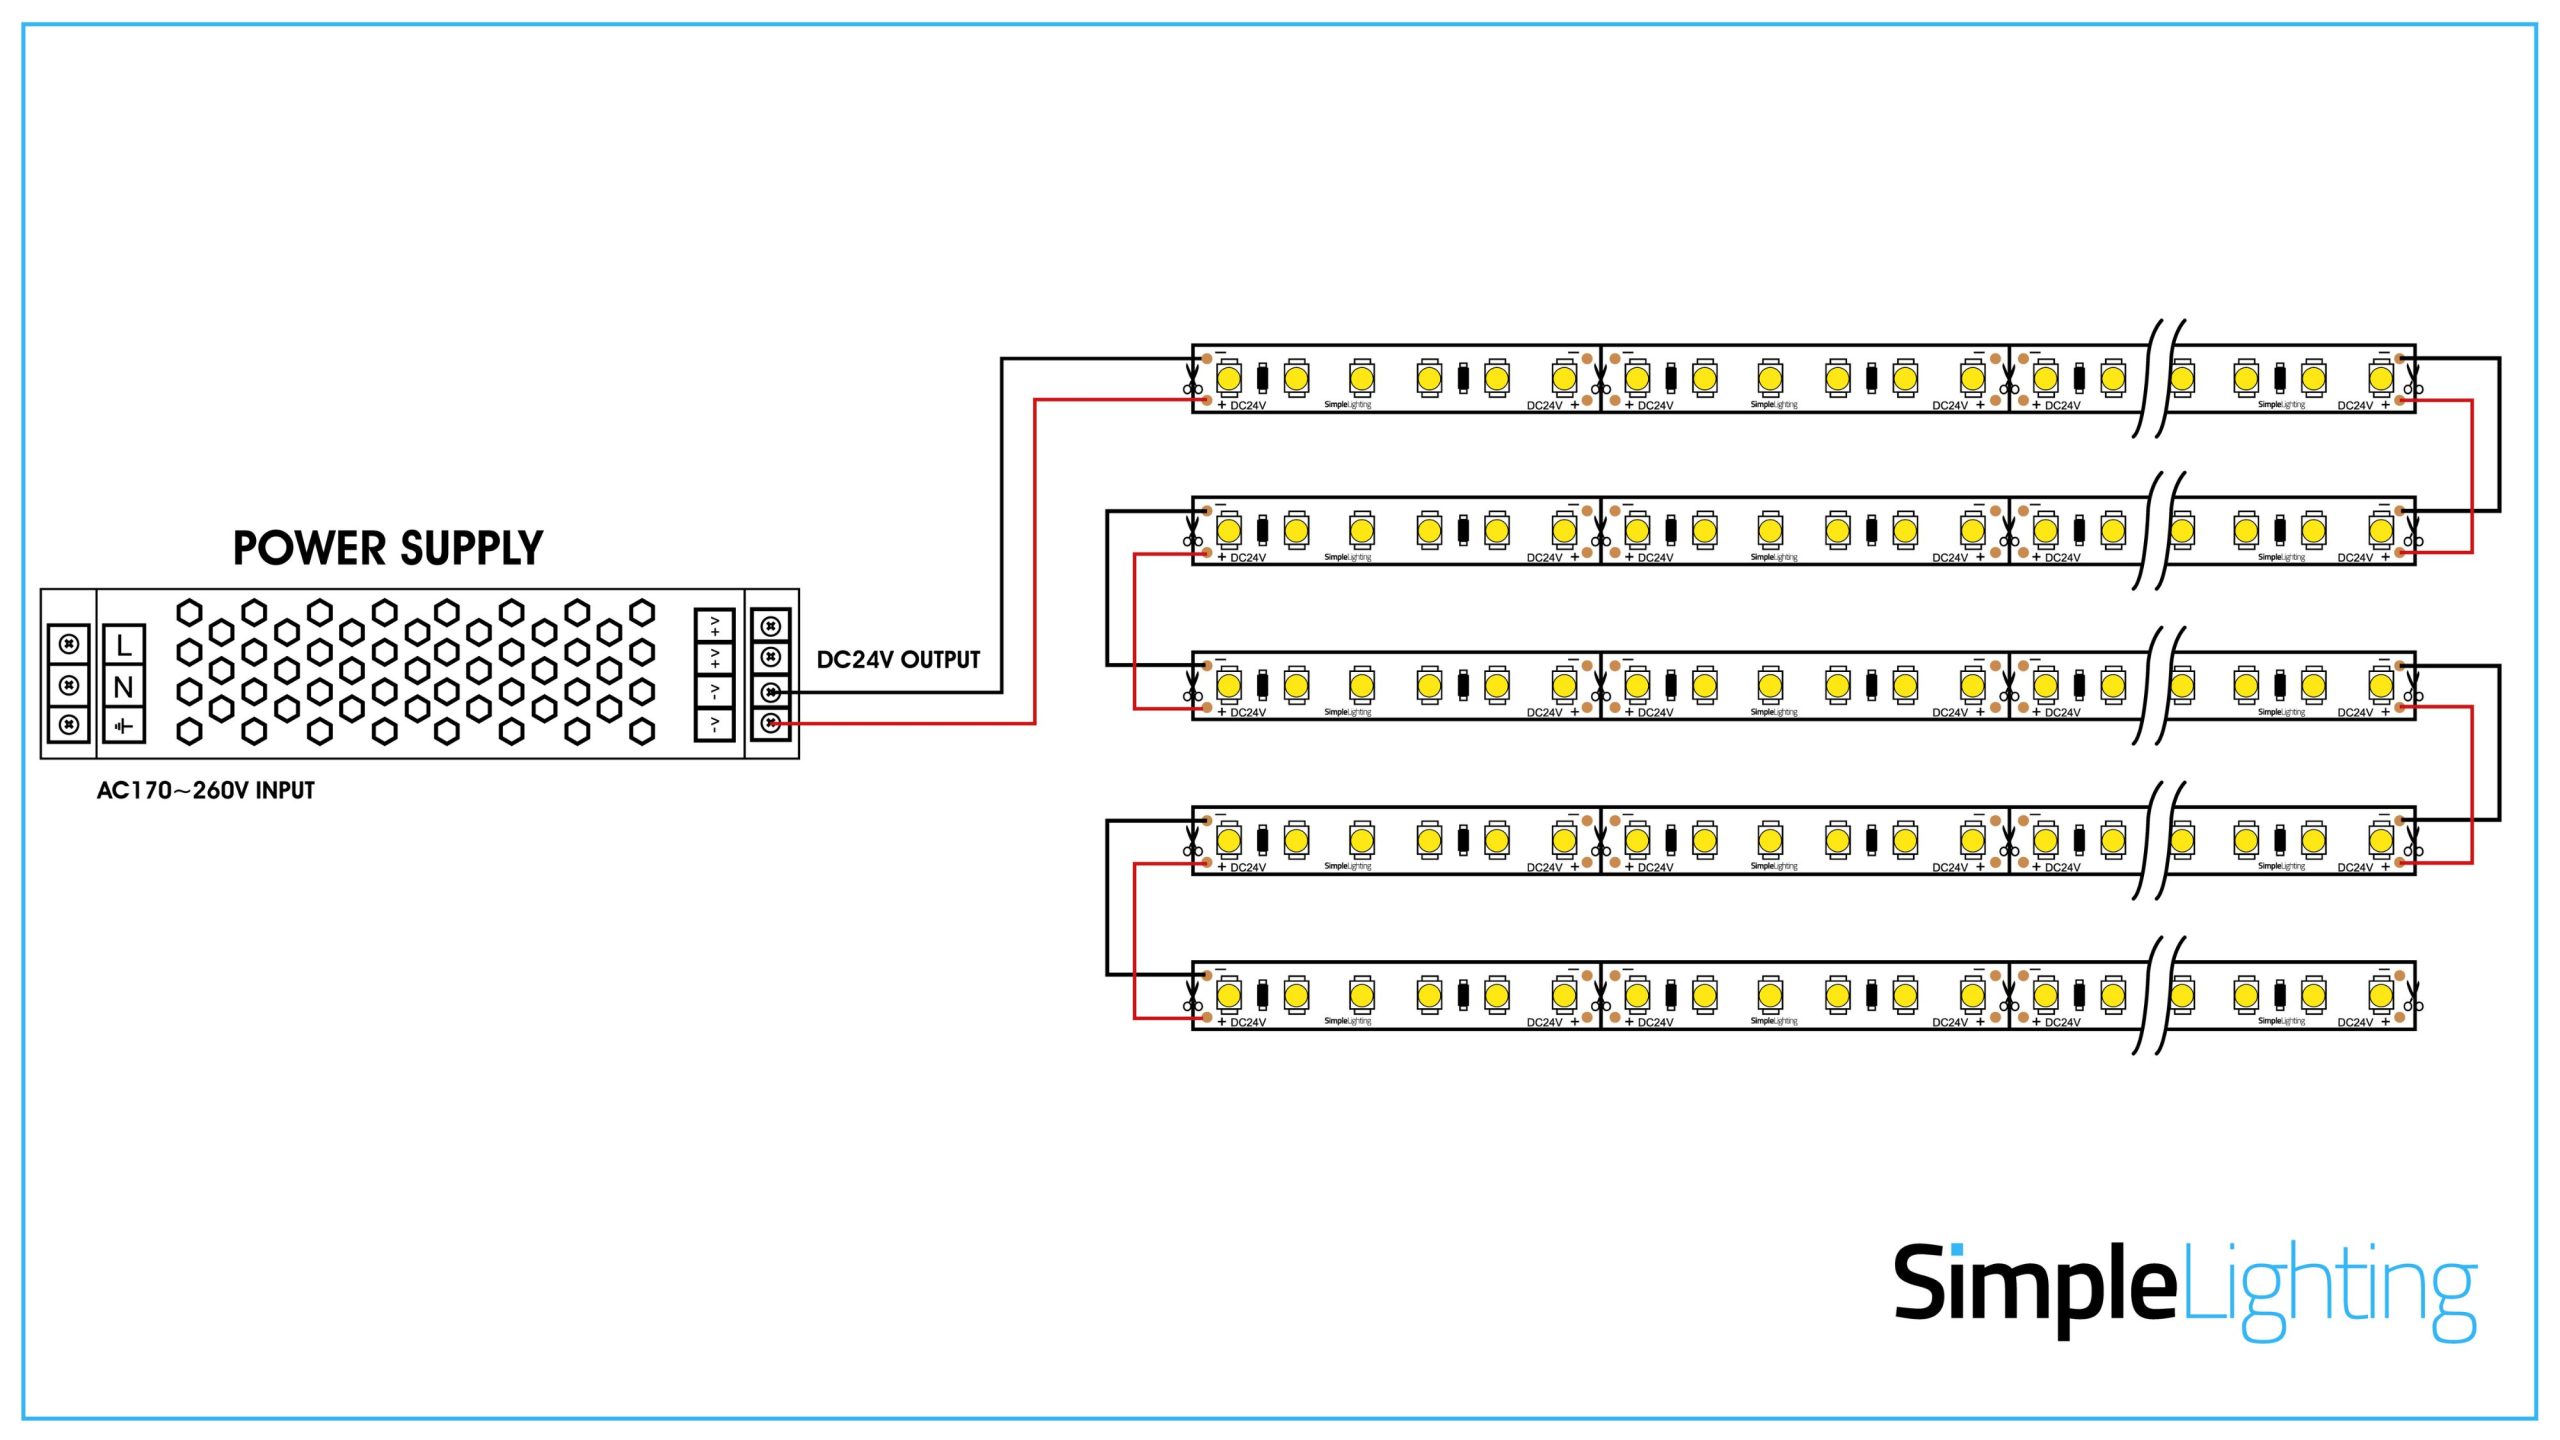
In series wiring, each LED section connects end-to-end in a single chain. The current flows through each LED, one by one, in a sequence.
✅ Simple to wire for short runs
❌ Causes voltage drop on long runs
❌ If one section fails, the following LEDs may dim or flicker
Series wiring is suitable for short runs (under 5m), but for longer installations, voltage drop becomes a significant issue.
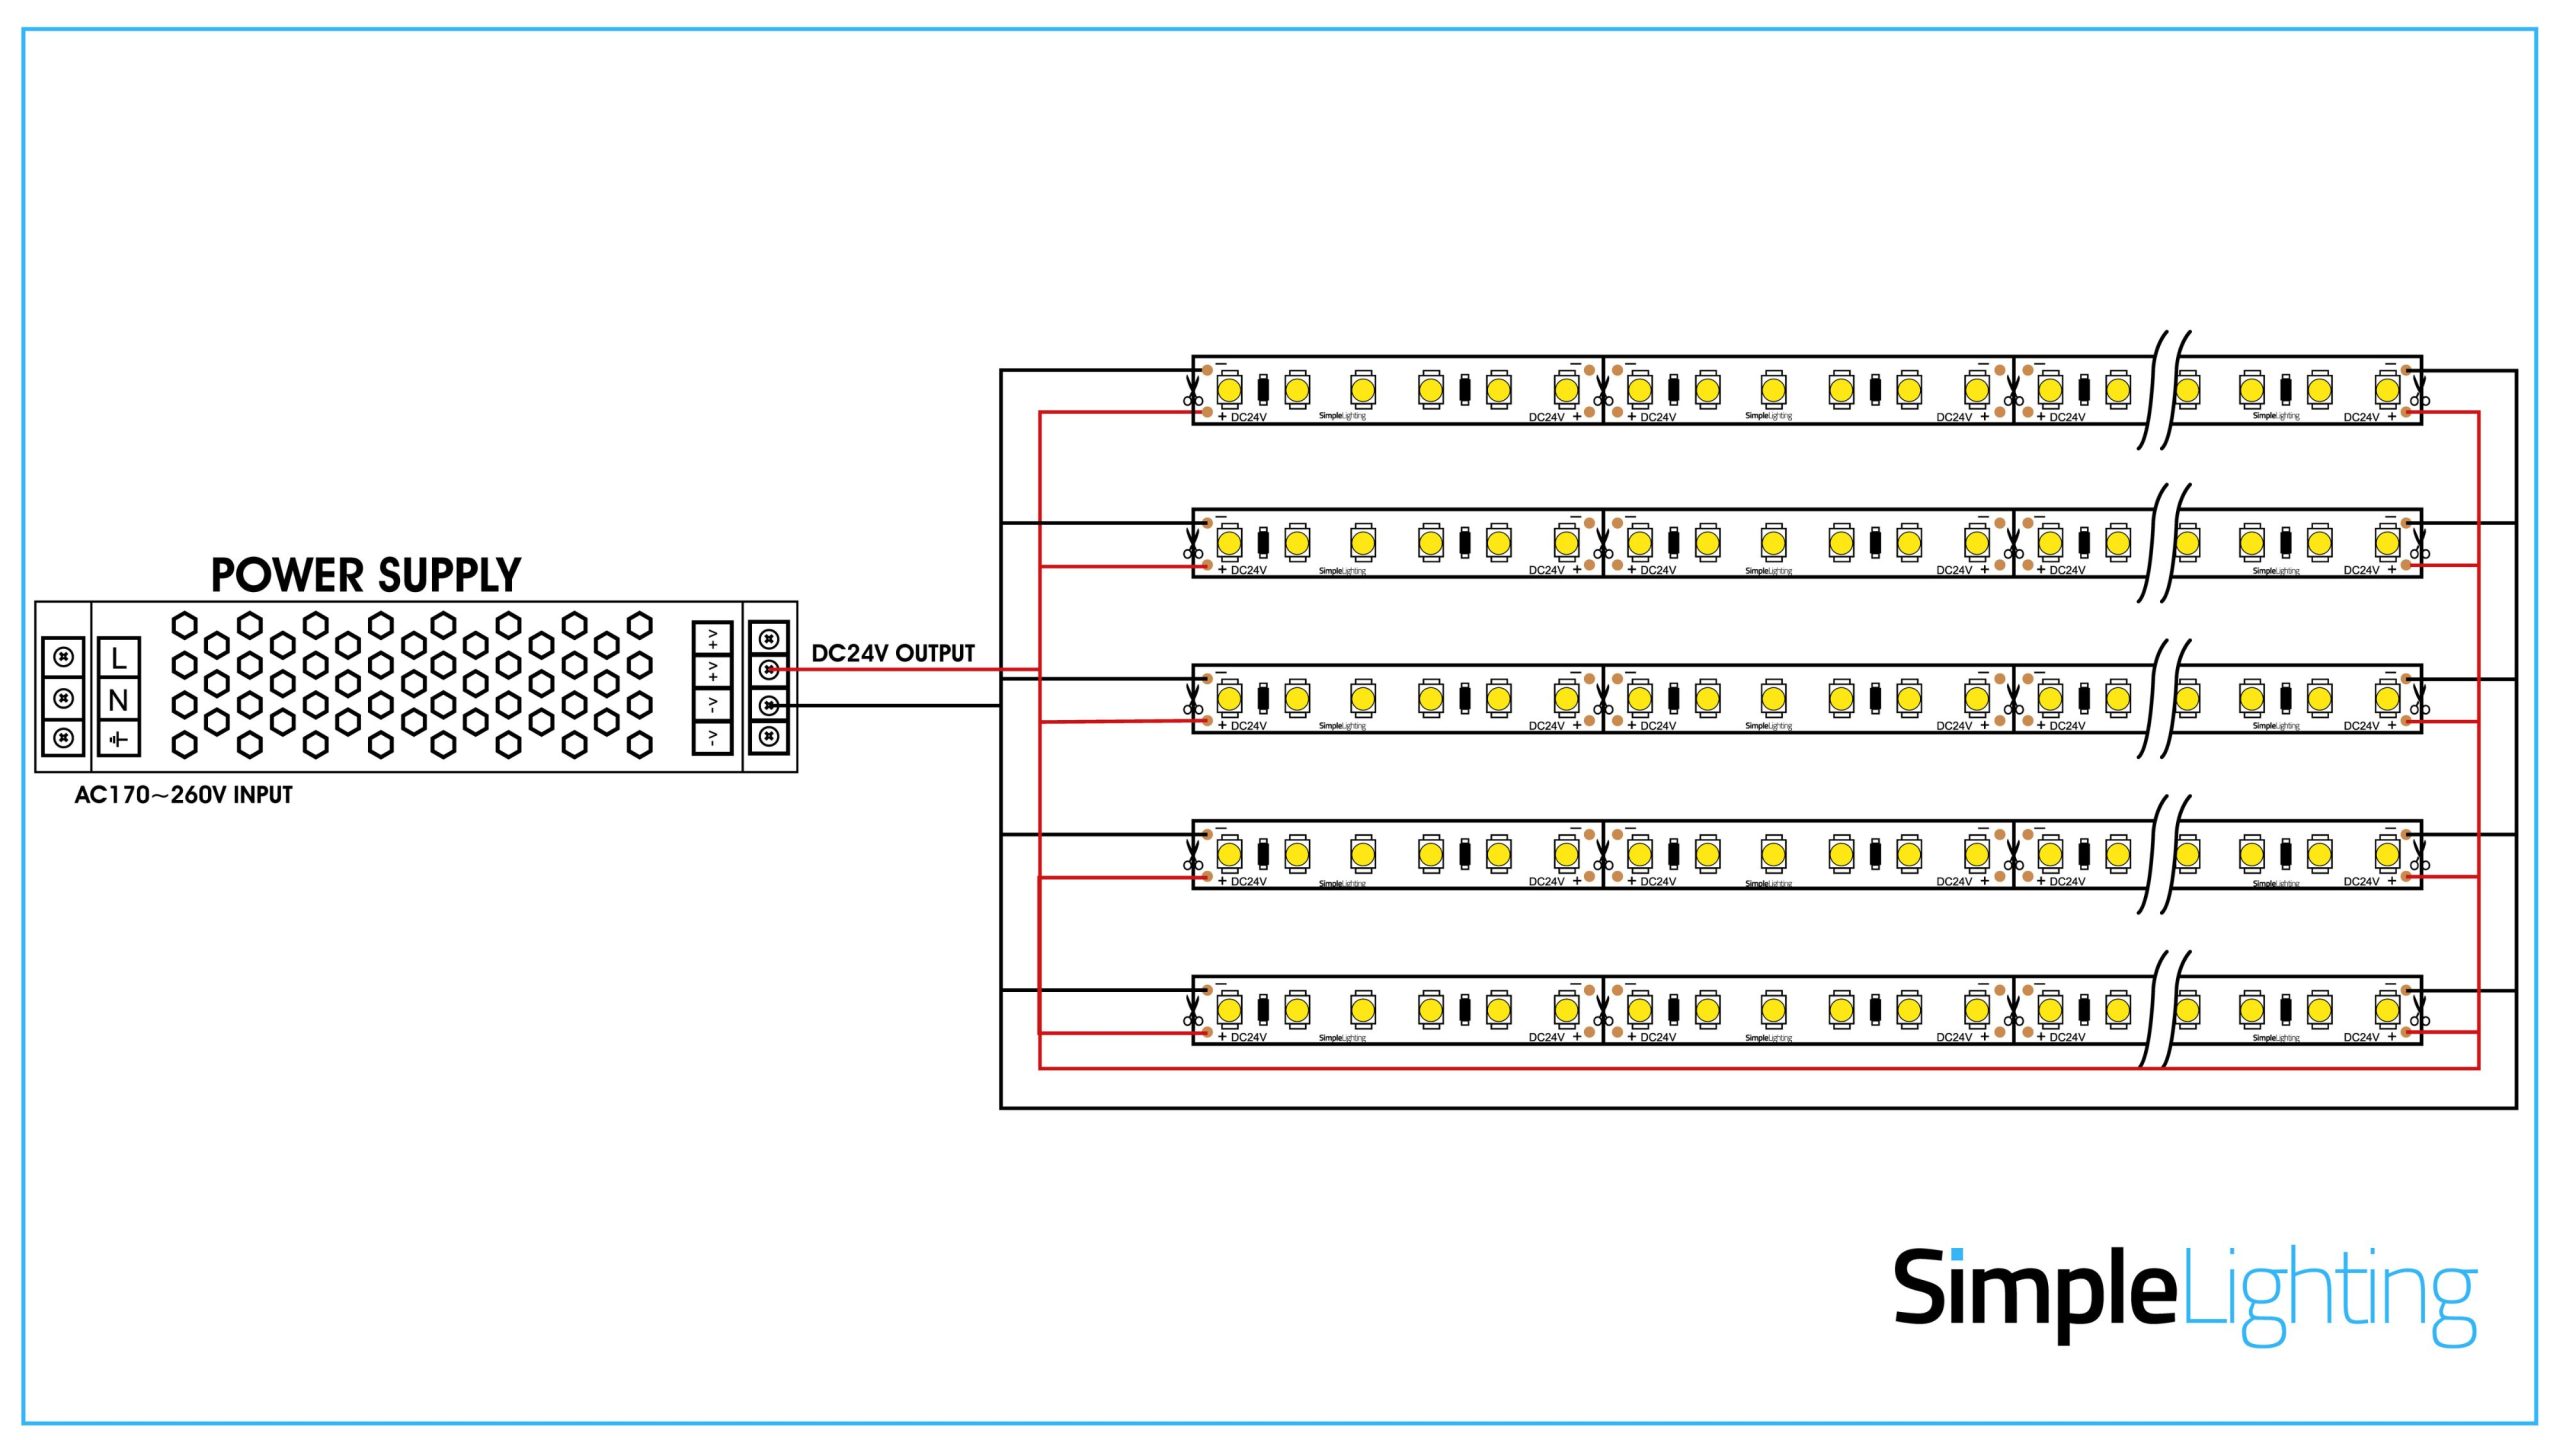
Parallel Wiring

In parallel wiring, each LED strip or section connects directly back to the power supply with its own positive and negative wire.
✅ Even brightness across all strips
✅ One section can fail without affecting others
❌ Requires more wiring and planning
Parallel wiring is the recommended method for multiple or long LED runs, as it ensures each section receives the same voltage (meaning, the same brightness).
Connecting Multiple LED Strips
When connecting multiple LED strips, never exceed the maximum length per run recommended by the manufacturer.
Typical maximum run lengths:
- 5 metres for 12V strips
- 10 metres for 24V strips
If you need longer runs, you can:
- Wire each section in parallel to the power supply.
- Use amplifiers or signal repeaters (for RGB/RGBW strips).
- Power from both ends to reduce voltage drop.
Voltage Drop and How to Prevent It
Voltage drop happens when the electrical current loses voltage as it travels through the wire, usually because of resistance.
In LED strips, voltage drop appears as dimming or uneven brightness, especially toward the end of the run (the furthest away from the power source).
Imagine a five-metre LED strip powered from one end: The first metre glows brightly, but by the fifth metre, it’s noticeably dimmer. That’s a voltage drop.
It’s a natural effect, but too much of it can make your lighting look patchy or inconsistent. Not very aesthetic!
How to Minimise Voltage Drop
Here are the best ways to keep your LED strips evenly bright:
- Use a higher voltage system – A 24V strip suffers less drop over distance than 12V or 5V.
- Keep cable runs short – Place the power supply close to the LED strips. Properly plan your layout.
- Use thicker wires – Lower resistance means less voltage loss. Thicker wires have lower AWG numbers.
- Wire in parallel – Feed each strip or section directly from the power source. Never wire in a series.
- Power from both ends – Particularly useful for long single runs. Power won’t drop if it’s getting it at both ends.
Safety Tips for LED Wiring
LED strips are low voltage, but that doesn’t mean they’re risk-free. Poor wiring or cheap components can still cause overheating, short circuits, or even fires if installed carelessly.
Follow these LED strip safety advice/guidelines to ensure a safe, reliable installation. You’ll thank yourself later.
1. Use the Correct Fuse or Circuit Protection
Always include a fuse or circuit breaker rated slightly above your total current draw. This prevents damage if there’s a short circuit or overload.
You know what they say, “Prevention is better than cure.”
2. Avoid Overloading Power Supplies
The 20% safety margin is there for a reason. Never exceed your driver’s rated wattage. Running at 80% or less of capacity helps keep temperatures down and extends its lifespan.
3. Insulate and Secure All Connections
Use heat-shrink tubing or insulated connectors to prevent exposed wires. Loose or bare connections can arc, spark, or short out.
4. Keep Wiring Away from Heat or Moisture
Water and electricity don’t get along, and never will. Only use IP-rated power supplies and cables in damp or outdoor areas. Keep all joints and connectors sealed and protected from water ingress.
5. Follow Electrical Regulations
In the UK, mains wiring must comply with BS 7671 (IET Wiring Regulations). If your project involves a direct mains connection, consult a qualified electrician.
Safety reminder:
Never attempt to wire mains voltage directly into an LED strip or LED controller. Always go through a certified LED driver or power supply.
Common Wiring Mistakes to Avoid
Even experienced DIYers make simple mistakes that lead to performance or safety issues. Don’t be that kind of DIYer.
Here are some of the most common wiring mistakes and how to avoid them:
1. Mixing Voltages
The biggest no-no.
Connecting a 12V strip to a 24V power supply (or vice versa) is a guaranteed way to damage your LEDs instantly. Always double-check voltage labels before wiring.
2. Undersized Power Supply
Using a power supply that’s too small can cause flickering, overheating, or damage to your lights, and possibly a little damage to your ego. Because… Why do it?
Always… ALWAYS calculate your wattage with a 20% buffer.
3. Poor Soldering or Loose Connections
Bad joints lead to intermittent lighting or hot spots. Use proper connectors or solder joints, and always secure them with insulation.
4. Ignoring Polarity
LED strips are polarity-sensitive. Connect positive (+) to positive, and negative (–) to negative. Reversed polarity means the strip won’t light at all.
5. Overly Long Series Runs
Running a single 10-metre 12V strip in a series will cause noticeable dimming at the far end.
Always opt for parallel wiring or power from both ends to maintain brightness.
6. Overloading Circuits
Don’t daisy-chain too many strips to a single power supply or circuit. Excess load generates heat and risks power supply failure. This is similar to Number 2.
Every Connection Counts
LED strip lighting is one of the most flexible and creative ways to brighten your home or workspace…
But only when you wire and power it safely.
The right power supply ensures stable voltage and long lifespan; the right wiring guarantees consistent brightness and reliability.
Here are the key takeaways from this guide:
- Always match your LED strip voltage to the power supply voltage.
- Calculate total wattage, then choose a power supply with at least 20% extra capacity.
- Use an appropriate wire gauge to minimise voltage drop.
- Opt for parallel wiring for longer runs or multiple strips.
- Prioritise safety with proper fuses, insulation, and IP-rated gear for outdoor use.
- Follow UK electrical regulations and consult professionals when working near mains voltage.
Proper planning is also a critical part of your wiring process. It may take a few extra minutes, but it pays off with flawless, flicker-free lighting that’s both safe and long-lasting.
When in doubt, Simple Lighting can help you choose the right LED drivers, connectors, and wiring accessories for your project.
Ready to dive into the rabbit hole of strip lighting? Check out more posts like this in LED Strip Lighting Made Simple: Channels, Controllers, and More.


