


Nobody in their right mind would install a carpet in their shower. That didn’t stop some people from sticking indoor-rated lights in garages that double as splash zones, though! It’s one of those DIY moves that continues to mind-boggle, not to mention guarantee flickering, failure, and a few swear words.
Your garage has its own climate. Dust, humidity, and mystery puddles can appear overnight. The lights you pick need to survive all that without short-circuiting or going on strike.
That’s where IP ratings come in! Those two little digits on your light fitting could spell the difference between “built to last” and “died valiantly during last week’s hose-down.”
In this guide, you’ll learn what those digits actually mean, how to match them to your garage’s conditions, and how to stop buying lights that treat moisture like kryptonite.
Understanding IP Ratings – The Secret Code on Your Light Fittings
See those two mysterious letters and digits (IP65, IP44, IP20)? They aren’t marketing fluff; they’re your light’s battle armour rating. “IP” is short for Ingress Protection. It’s just a simple yet snazzy way to show how well a bulb resists dust and water.
Here’s how it works:
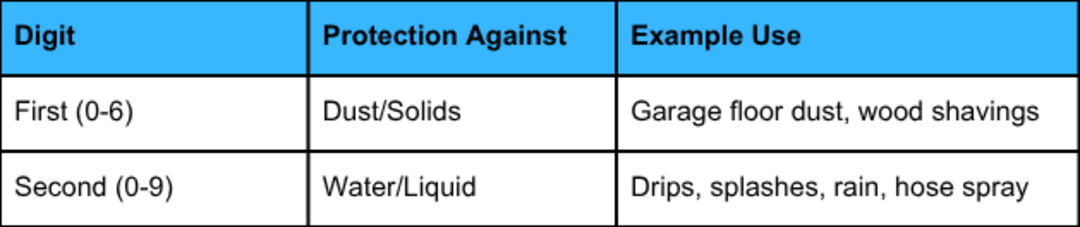
Basically, higher numbers mean tougher lights. And in a garage full of dust, condensation, and questionable puddles, toughness matters.
Pro Tip 1: Check both digits. A light that laughs at water but chokes on dust isn’t much help in a garage.
So before you click “add to cart,” look for an IP rating that can actually survive your weekend cleaning spree or that accidental car wash overspray.
Typical Garage Conditions and Their Lighting Needs
Garages are sneaky. They look harmless, but they’re basically mini weather systems, dusty in summer, damp in winter, and occasionally flooded when someone forgets to close the door. That’s why choosing the right IP rating isn’t about being fussy; it’s about keeping your fire-rated downlights alive.
Scenario 1: The Dry and Tidy Garage
If your garage double-duties as a storage unit for Christmas decorations, you’re safe with IP20 to IP44 lights. Dust is your only enemy, and even that’s mild.
Scenario 2: The Occasionally Damp Garage
You wash your car, spill things, or deal with condensation that shows up uninvited. IP44 to IP54 lights are the sweet spot. They’re built to handle splashes without panicking.
Scenario 3: The Workshop or Car Wash Special
Power tools, sinks, and regular pressure-washing? That’s a job for IP65+ fittings. Anything less will short out faster than your patience on DIY day.
Pro Tip 2: Look around your garage before buying. If you see water stains, rust, or mysterious damp patches, that’s your sign — upgrade your lights or prepare to shop again soon.
Recommended IP Ratings for Different Garage Areas
Not every corner of your garage needs industrial-strength, submarine-grade lighting. Some zones stay bone dry; others might as well have their own raincloud. Here’s how to match your lights to the chaos level of each area:
Dry Zones
These are your safe spots: ceiling centres, high shelves, or walls far from doors and damp corners. For these calm, dust-only areas, IP20-IP44 will do the trick. There’s no point paying extra for waterproofing when the only moisture around is your morning coffee. Lower ratings here are excellent, and your wallet will thank you.
Moist or Damp Zones
Now we’re talking about the garage door area, near sinks, or anywhere condensation likes to party. Go for IP44 to IP54 lights that laugh off splashes, handle humidity, and shrug at the occasional hose spray. They’re sealed just enough to keep out both moisture and the fine dust that loves to coat everything you own.
High Exposure Zones
This is where things get dramatic. Think open-door areas, car wash corners, or spots that see more spray than a seaside café window. You’ll need IP65+ fittings here. These are fully dust-tight and built to withstand water jets, condensation, and your most over-enthusiastic cleaning sessions.
Pro Tip 3: Don’t assume “one light fits all.” Mapping your garage zones first saves you from future replacements, flickering bulbs, and the occasional shout of “Why is that one still dripping?” Each area has its own quirks, and the right IP rating is the difference between a well-lit workspace and a DIY horror story.
Choosing the Right Type of Garage Light
Now that you cracked the code of IP ratings, it’s time to pair them with the correct type of light. Because while the rating keeps your light alive, the type determines how well it actually brightens your garage (and how good it makes your DIY disasters look).
Ceiling Lights
For overall brightness, LED battens or panels are your best mates. They spread light evenly, don’t flicker, and last forever (or at least long enough to outlive that half-finished project in the corner). In dry areas, IP44 is fine; near doors or damp walls, bump it up to IP65.
Task or Under-Shelf Lights
If you do any sort of tinkering, you’ll want focused lighting. Choose LED strips or compact task lights rated at least IP44, especially if you’re near sinks or damp tools. They keep your workspace bright without shorting out mid-project.
Motion Sensor Lights
Perfect for hands-free brilliance. You walk in, they light up. Just make sure they’re rated IP54 or higher if they’re near doors or exposed to drafts.
Pro Tip 4: Always choose LEDs. They’re energy-efficient, low-heat, and less likely to fry themselves when moisture sneaks in. The right combo of type and rating means you’ll spend more time working and less time replacing soggy light fittings.
Installation & Maintenance Tips for IP-Rated Garage Lights
Already picked the right lights? Brilliant! Now, let’s make sure they actually stay bright. Installing and maintaining IP-rated garage lights isn’t rocket science. Still, a few smart moves will save you headaches (and replacement costs) later.
Safety First — Always Switch Off the Power
This one’s non-negotiable. Turn off the mains before installing or adjusting your lights. It sounds obvious, yet many DIY heroes have learned the “live wire lesson” the hard way. Electricity and enthusiasm don’t mix; one quick check can literally save your life.
Mount and Seal Properly
Make sure every fitting is tight, especially around doors, ceilings, or damp walls. A loose light isn’t just an eyesore. It lets in dust and moisture, which defeats the whole purpose of buying an IP-rated fitting. Use proper seals, gaskets, and waterproof connectors to keep everything airtight.
Keep It Clean (But Not Too Clean)
A quick wipe-down every few months prevents dust, cobwebs, and mystery fluff from building up. Skip the pressure washer; even IP65 lights don’t need that kind of punishment. A mild cleaner and a piece of soft cloth will do the trick.
Inspect Your Wiring
Rust, corrosion, or frayed wires? That’s your cue to replace them. Don’t wait until the light flickers like a haunted house! Deal with issues early for years of reliable performance.
Pro Tip 5: Treat your garage lights like any other investment. A little care keeps them bright, safe, and far from the “why’s it sparking again?” category.
Mistakes to Avoid When Choosing IP-Rated Garage Lights
Even the most confident DIYers can get tripped up when buying garage lights. One wrong rating, and suddenly your “maintenance-free setup” becomes a flickering nightmare. Let’s steer clear of the most common blunders.
Using Low-IP Lights in Damp Zones
You wouldn’t wear flip-flops in a puddle, so don’t use IP20 lights near water. Garages get damp, even if you think yours doesn’t. Always go for IP44 or higher around doors, sinks, or anywhere that feels humid enough to ruin your hair.
Assuming One Rating Fits the Whole Garage
Every garage has microclimates: dry zones, damp spots, and full-blown splash zones. Mapping your space before you buy prevents wasted money and unnecessary replacements. One size rarely fits all here.
Ignoring Manufacturer Instructions
If you skip the installation guide, you’re basically asking for trouble. Manufacturers include instructions for a reason (usually because someone’s already made that mistake).
Forgetting About Dust and Condensation
Water isn’t the only villain. Fine dust, sawdust, and condensation can sneak into cheap fittings faster than you think. Pick a light that’s sealed properly to handle both.
Pro Tip 6: Before you click “buy,” ask yourself: Where’s this light going, and what will it face? A few extra seconds of planning beats hours of rewiring later (or worse, explaining to your mates why your “new setup” died in a week).
Protect Your Garage Lighting with the Right IP Rating

Choosing garage lights isn’t just about brightness. It’s also about survival. Between dust, condensation, and the occasional hose attack, your fittings need the right IP rating to stand a chance.
Think of your garage in zones, and match each area with the appropriate IP rating. That way, you’ll avoid flickering lights, short circuits, and that unmistakable smell of burnt wiring.
A well-rated light doesn’t just last longer; it keeps your garage safer and your weekend projects running smoothly. The proper setup means less maintenance, fewer replacements, and more time to actually get things done.
At Simple Lighting, we make it easy to find the perfect IP-rated LED lights for every corner of your garage. Explore our products today and give your lighting the protection (and reliability) it deserves!
And don’t forget to check out How to Choose the Best Lighting for Your Garage.


